
Visioix Pro can pass new visitor responses to the tools your team already uses, and run automatic follow-up when a response matches your rules. Start with one narrow connection or rule, test it with example data and watch its log before you rely on it.
Integrations
Where to find it: ARN Visioix → Settings, then the Integrations tab (the page is called Advanced Integrations). Its tabs are Connections, Delivery Logs, Retry Queue and Incoming API.
Create a connection
Visioix Pro has seven built-in connectors:
| Connector | Use it to |
|---|---|
| Webhook | Send response data to any secure webhook endpoint |
| REST API | Connect a custom JSON REST API |
| Zapier | Start a Zap from every qualified response |
| Make | Send response data into a Make scenario |
| Slack | Post new response notifications and scheduled reports (chosen in Schedule a report) to a Slack channel |
| Discord | Post new response notifications to Discord |
| CRM / Custom API | Map Visioix fields to a CRM or business system |
- Under Create a connection, choose a connector and click Connect.
- Connection: enter a Connection name and the HTTPS endpoint. The How to connect box lists the steps for the selected service, for example "Choose Webhooks by Zapier as the trigger" and "Select Catch Hook" for Zapier. HTTP addresses are not accepted.
- Authentication: choose the Method: No authentication, Bearer token, API key (with its header name) or Basic authentication. Credentials are encrypted and never shown again after saving. Zapier, Make, Slack and Discord webhook URLs need no authentication.
- Field Mapping: keep the default field names or rename them to match the destination.
- Review & Activate: select Activate after saving if the connection should start right away, then click Save Integration.
Every delivery uses safe defaults: a 15-second timeout, no redirects, encrypted credentials and HTTPS-only endpoints.
Test and manage connections
Under Your integrations, each connection shows its last delivery and its delivered and failed counts. Use Test to send test data before you use a connection with live responses, and Edit, Pause or Activate, Duplicate (the copy starts paused) or Delete as needed.
- Delivery Logs list every successful and failed delivery with the HTTP status, attempt and duration.
- Retry Queue shows failed deliveries. They are retried automatically with increasing wait times; Retry now tries again immediately.
Enable only the connections you need. A connection is not permission to send every stored response everywhere: check what the destination receives and who can see it there.
Incoming API
The Incoming API tab lets an authorised external system update or read Visioix data:
- Receive data: send a POST request to the Webhook endpoint shown, with the X-Visioix-Key header and JSON containing
response_idand asegment,tagsorlead_score. Add a uniqueX-Request-IDheader to prevent duplicate processing. - Read responses: send a GET request to the Responses endpoint shown, with the X-Visioix-Key header. Use the
pageandper_pageparameters (up to 100 per page).
The endpoints belong to the arn-visioix/v1 REST namespace of your site. Requests are limited to 120 per minute, and only permitted fields are accepted. Keep the key private and store returned data only in authorised systems.
Automation
Where to find it: ARN Visioix → Automation. The tabs are Workflows, Execution Logs and Queue.
Click Create automation and work through the four steps:
- Automation details: Automation name, Status (Paused or Active) and Description.
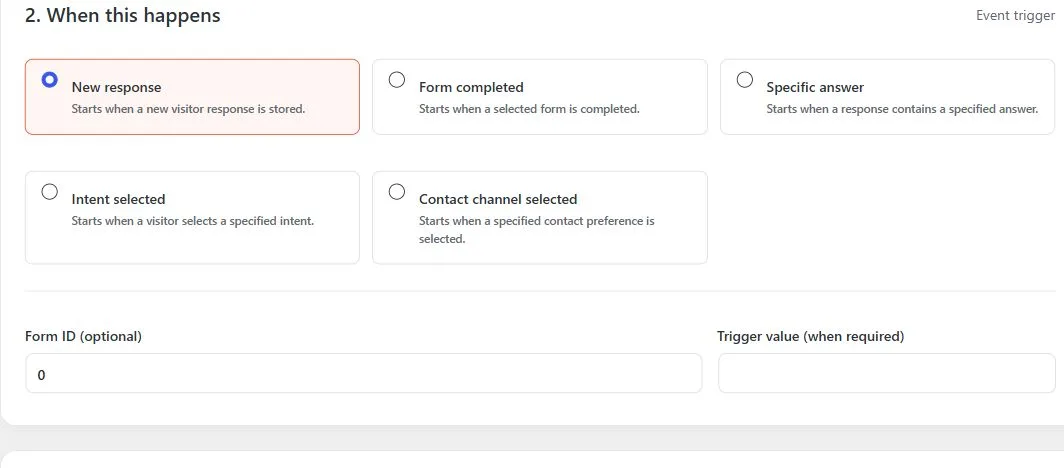
- When this happens: choose the Event trigger: New response, Form completed, Specific answer, Intent selected or Contact channel selected. Optionally limit it to a Form ID, and enter the Trigger value when the trigger needs one, such as the intent or the answer.
- If these conditions match: build condition groups with Match all (AND) or Match any (OR), using the form, intent, contact channel, answer value, email or page URL. Add OR group adds an alternative group.
- Then do this: add actions in the order they should run: Send email, Internal notification, CRM sync, Send webhook, Add tag, Create follow-up or Create task. Each action row shows the action type, an optional action label, Delay (minutes) (up to 43,200, which is 30 days) and the × button that removes the action. The fields of the selected action appear on their own line below: recipient email, email subject and email message for Send email; subject and message for Internal notification; the integration ID for CRM sync and Send webhook; the tag for Add tag; and the task or follow-up title for Create follow-up and Create task. On narrow screens every field takes the full width. In email content you can use
{response_id},{intent},{name},{email}and{page_url}.
Click Save automation.
The Workflows list shows each automation with its trigger, actions, successful executions and failed attempts. Execution Logs show every action result with its attempt and duration, and Queue lists pending, delayed and failed actions with Retry now.
The connectors and the automation triggers, conditions and actions are built in; other plugins cannot add their own.
Timing and limits
- The integration and automation queue runs every 15 minutes by default. Change it under Settings → Data & Cache → Background Processing (every 5, 10, 15 or 30 minutes). Shorter intervals deliver sooner but put more load on the server.
- The daily notification email and AI limits under Settings → Limits & Proxy do not affect integrations and automations.
- Integrations and automations deliver responses. Growth reports are sent by email from Warnings & Reports.