
Four Smart Features improve posts and pages: Post Features, Intro Video, Heading Widow Guard and Reader Question Box. Each has its own tab and switch.
Where to find them: ARN Vendix → Smart Features, in the Design & Content and Site & Visitors groups. These features are part of Vendix Pro.
Post Features
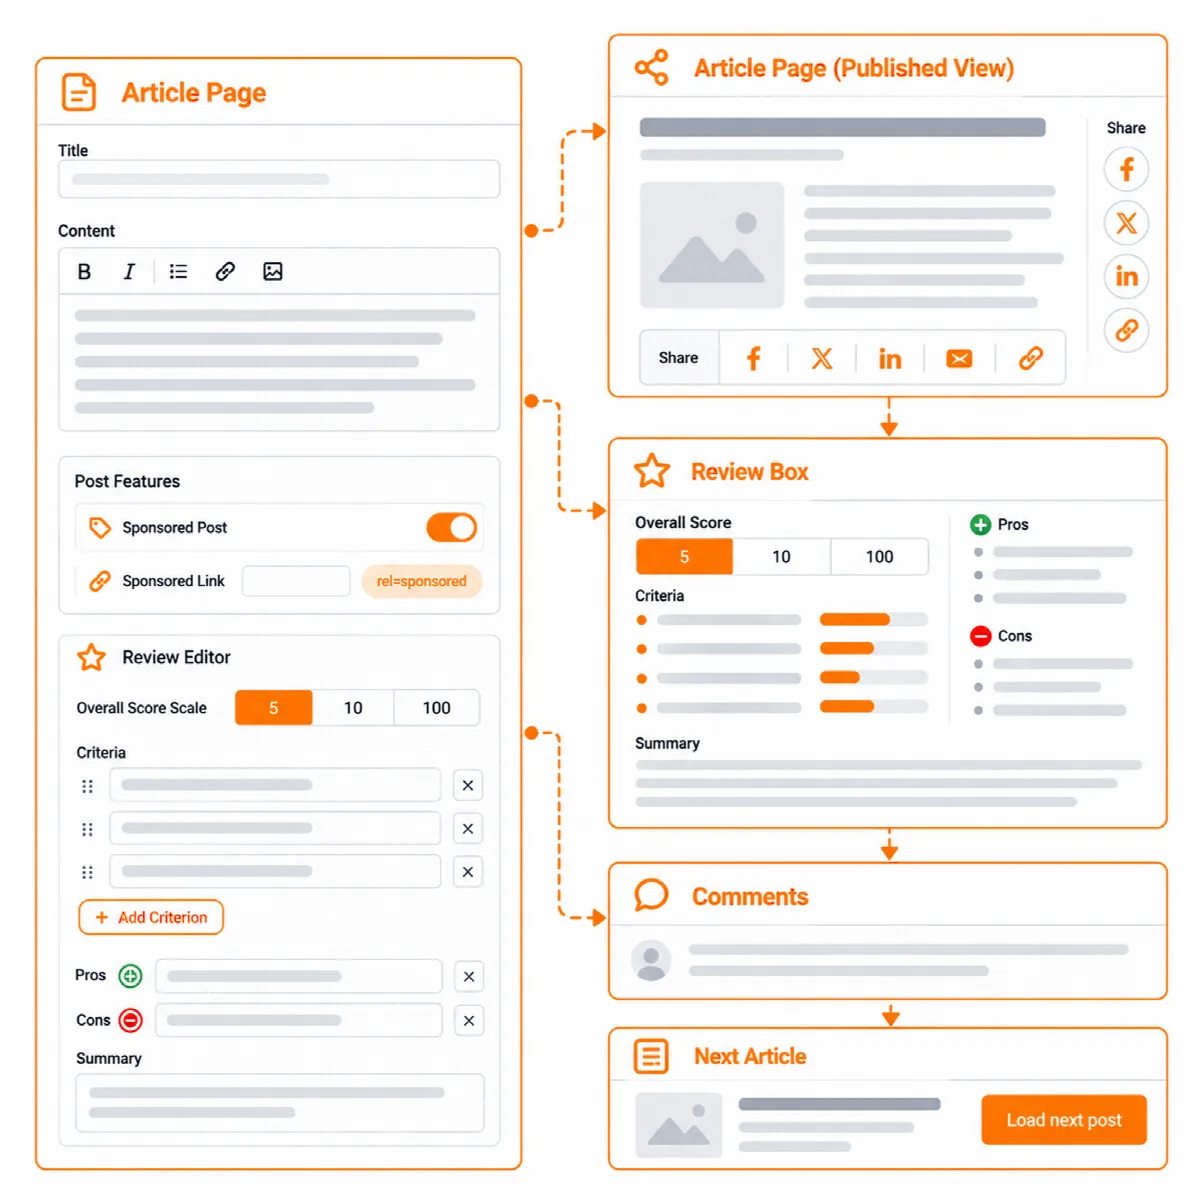
Post Features adds share buttons, a review box, a sponsored label and the next post to the posts of every site type. The Newspaper module does not have to be on.
- With Vendix Theme, the parts appear in the places the theme opens around the post text. Share buttons need Vendix Theme 1.3.0 or later.
- With other themes, use the ARN Reading Time & Share Bar and ARN Review Box widgets, or ARN Post Content and ARN Post Meta in a Vendix post template, which open the same places.
Set up the site-wide options
- Open Smart Features → Post Features.
- Share buttons on posts: choose the Place: above the text, below the text, above and below the text, or beside the text (vertical bar). For "beside the text", choose what phones and tablets show: a Bottom bar or no share buttons. The buttons are plain share links: nothing is loaded from the networks and no counts are shown.
- Review box: choose the default place: below the post text, above the post text, or only where an ARN Review Box widget is placed.
- Sponsored posts: choose whether the label shows in the post head and on post cards, and set the default label text.
- Next post: turn on Load the next post below the comments and choose whether the next post is the previous post of the same category or of any category, and how many posts load in a row. After that, a Load the next post button appears.
- Click Save Vendix Settings.
Fill in a review or mark a post as sponsored
Each post has a Vendix Post Features box on its edit screen:
- Review: tick This post reviews something, then fill in the reviewed item, the item type, the Rating scale (out of 10, out of 5 stars or percent), the Overall score (empty uses the average of the criteria), the criteria, pros, cons and a summary. Show the box can override the default place for this post.
- Sponsored: tick Mark this post as sponsored, optionally write your own label text such as "Sponsored by …", and choose whether to add
rel="sponsored"to links to other sites in this post. Links to your own site are not changed.
The posts list can filter sponsored posts. The review adds a Review node to the page's structured data while Vendix publishes the schema (SEO & Visibility). When ARN Contix or another SEO plugin publishes the schema, the box still shows without Review schema.
Intro Video
Intro Video shows a full-screen introduction video without adding code to Elementor.
- Open Smart Features → Intro Video and turn on Enable intro video.
- Choose a Desktop video, a Mobile video and a Poster image.
- Choose whether to Show globally only on the front page, and the Display frequency: Every visit, Once per session or Once per day.
- Set the Skip button text, the Manual play button text, the fade duration and whether to Show sound on/off button.
Browsers may need a visitor's action before a video plays or has sound, so the poster and the manual play button are part of the experience.
Heading Widow Guard
Heading Widow Guard keeps the last words of a heading together, so the last line never holds one lonely word.
- Open Smart Features → Heading Widow Guard and turn on Enable Heading Widow Guard.
- Choose Words kept together: last 2 or last 3 words. A heading with this many words or fewer is left as it is.
- Choose where it works: post and page titles shown on the page, headings (H1–H6) inside post and page content, and headings inside Elementor widgets.
Only the visible page changes. The browser title, SEO metadata, menus and admin screens keep the plain title.
Reader Question Box
A short question slides up while the reader is part-way down a post, page or product, with a one-line comment field.
- Open Smart Features → Reader Question Box and turn on Enable Reader Question Box.
- Choose the content types that show the box, how far the reader must scroll (%) and how long they must stay (seconds), and the distance from the bottom of the screen. Raise the distance if your site has a fixed bottom menu or an ad bar.
- Write a default question, and optionally one question per content type, one per line, as
content type|question. Example:product|Would you recommend this product? - On a single post, page or product, the Reader question box lets you write a question for that content, use Suggest with AI, or tick Do not show the question box on this content.
The box appears only where comments are open, and a reader who closes it does not see it again on that content. Answers are ordinary WordPress comments, with your usual moderation and spam tools.