
Shipment Tracking adds tracking numbers to WooCommerce orders, sends an "Order shipped" email and offers an order tracking page. Vendix Templates → Emails designs WooCommerce emails from sections with a live preview and test emails. Vendix does not connect to carrier systems: the tracking link opens the carrier's own tracking page.
Where to find it: ARN Vendix → WooCommerce → Shipment Tracking and Vendix Templates → Emails. Both are part of Vendix Pro; Shipment Tracking is off until you turn it on. The email designs need the permission to manage WooCommerce.
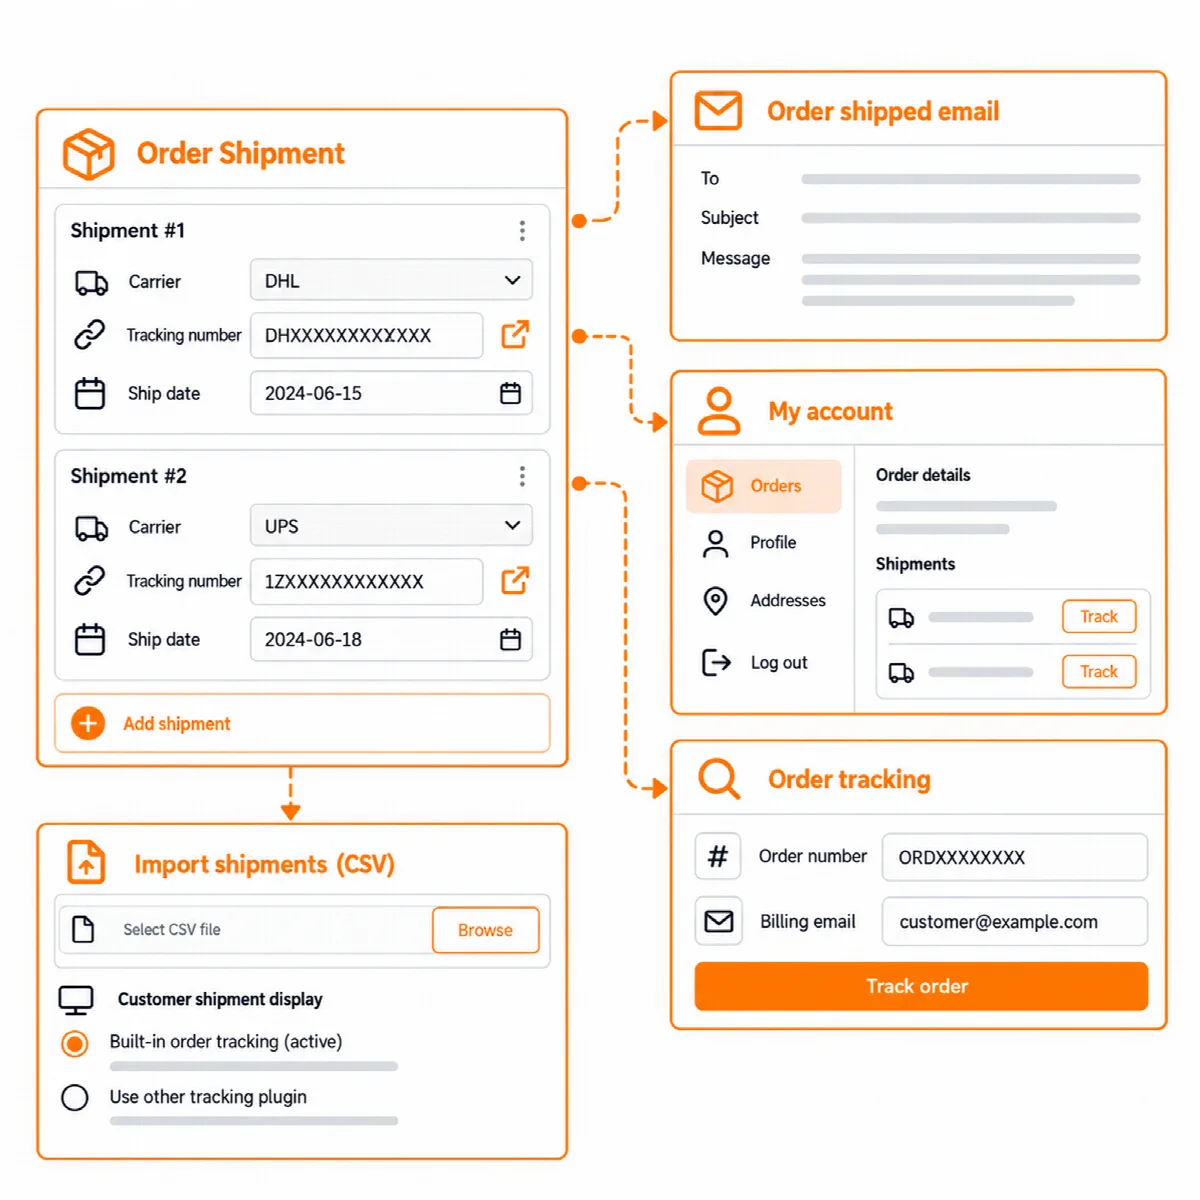
Set up shipment tracking
- Open ARN Vendix → WooCommerce → Shipment Tracking, turn it on and save.
- Under Carriers, tick the carriers offered in the order box. When none is ticked, all are offered. Add a carrier that is not in the list with its own name and tracking address.
- Create a page for order tracking with the
[arn_order_tracking]shortcode or the ARN Order Tracking widget, and choose it as the Order tracking page. - Save.
| Region | Carriers in the list |
|---|---|
| Türkiye | Yurtiçi Kargo, Aras Kargo, MNG Kargo, PTT Kargo, Sürat Kargo, HepsiJet, Kolay Gelsin, UPS Türkiye |
| Gulf | SMSA Express, Aramex, Naqel Express, SPL (Saudi Post), J&T Express (Saudi Arabia), Emirates Post, Qatar Post |
| Worldwide | DHL Express, DHL eCommerce, DHL Paket (Germany), UPS, FedEx, USPS, Royal Mail, Parcelforce, Evri, DPD, DPD UK, GLS, TNT, PostNL, La Poste Colissimo, PostNord, Canada Post, Australia Post |
Add a tracking number to an order
- Open the order in WooCommerce → Orders.
- In the Shipment tracking box, choose the carrier, enter the tracking number and the shipping date, and add the shipment. An order can hold several shipments.
- Save the order. Works on the classic order screen and with the WooCommerce order tables (HPOS).
What customers see
- "Order shipped" email: a WooCommerce email with the carrier, the tracking number, a tracking link and a link to the order tracking page.
- Completed order email: the tracking details also appear in WooCommerce's "Completed order" email.
- My account: customers see the shipments of each order on their account pages.
- Order tracking page: a form for the order number and billing email, then the order's shipments. The page also takes the order tracking template of Vendix Templates, and guests find their PDF documents there when PDF documents are on.
Import tracking numbers
- CSV upload: use Import tracking numbers to add numbers for many orders at once from a CSV file. Shop managers can use the import too.
- One-click import: numbers kept by WooCommerce Shipment Tracking or Advanced Shipment Tracking can be copied into Vendix in one step.
Other tracking systems
- While WooCommerce Shipment Tracking or Advanced Shipment Tracking is active, that plugin keeps showing tracking to customers and Vendix sends no "Order shipped" email, so a shipment is never shown twice.
- When WooCommerce's own Order Fulfillments feature is on, you choose which system customers see. With Vendix chosen, WooCommerce's fulfillment emails are not sent; with WooCommerce chosen, Vendix shows nothing to customers.
Shipments are included in the WordPress personal data export and erase tools, and a full clean-up on uninstall keeps order shipments.
With other store modules
From Vendix 3.0.0, other store modules use the shipments:
- Customer Order Changes: an order with a shipment can no longer be changed or cancelled by the customer.
- Returns & Exchanges: the return parcel of a request takes its carrier and tracking number from the same carrier list, with your own carriers.
- Shipping label: the 100 × 150 mm label of the PDF documents prints the carrier and tracking number of the order's last shipment.
See WooCommerce returns, exchanges and customer order changes and WooCommerce PDF invoices and checkout contracts.
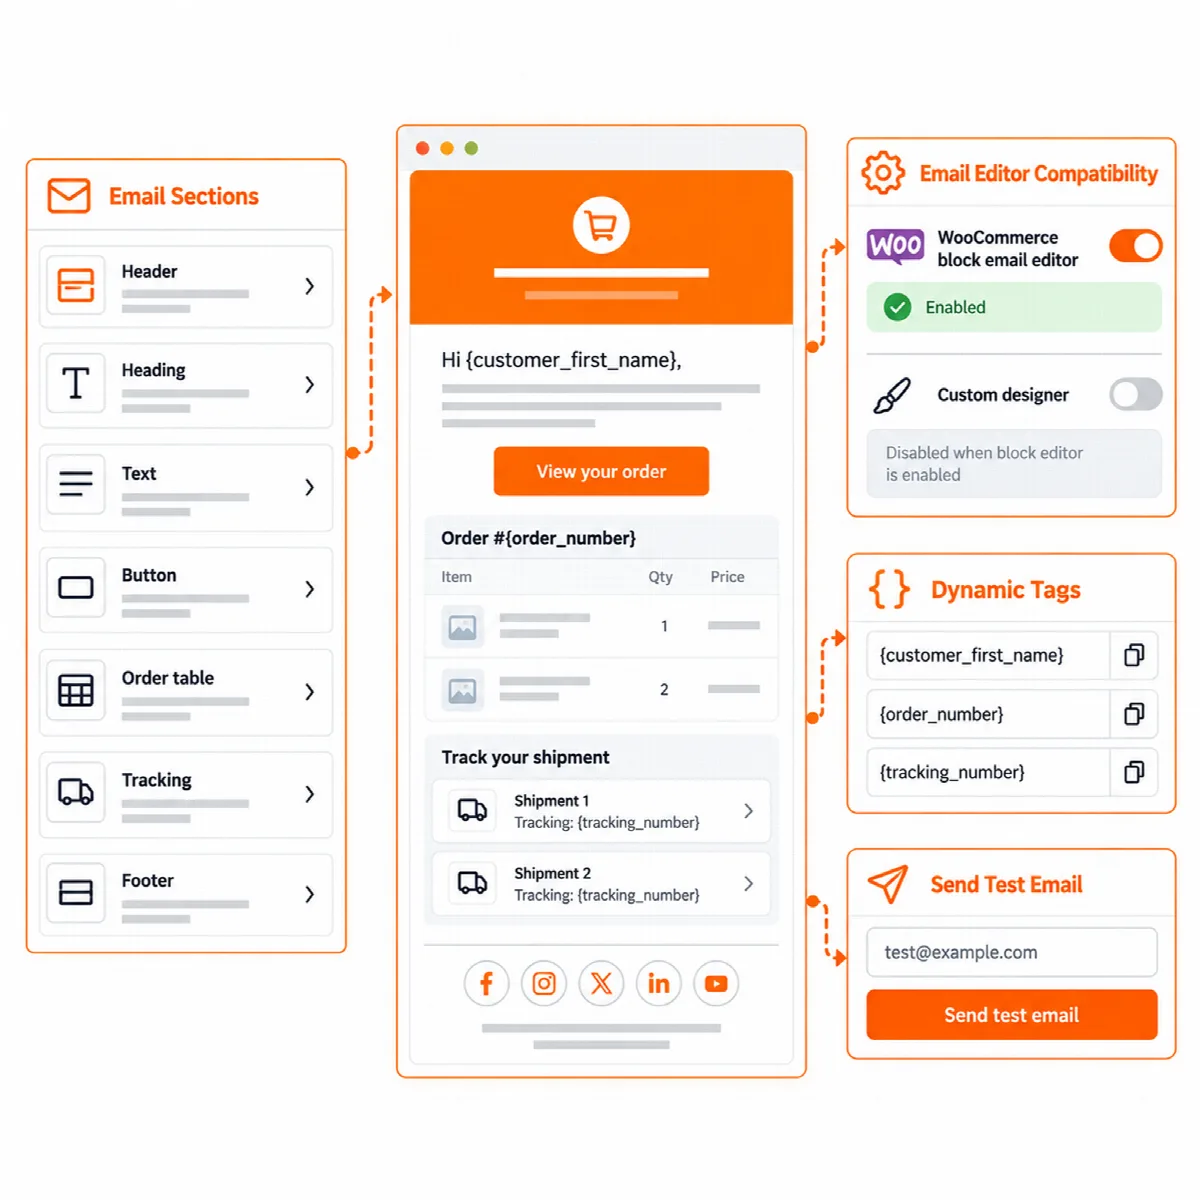
Design your store emails
- Open Vendix Templates → Emails.
- Build the design from sections: logo, heading, text, button, order table, shipment tracking and footer.
- Use dynamic tags in the texts, such as
{customer_first_name},{order_number},{tracking_number}and{tracking_page_url}. - Check the live preview with a sample order (including two shipments) or with a real order chosen by its number.
- Send a test email to see the design in a real mailbox.
- Choose the WooCommerce emails that use the design. A design can be used for every WooCommerce email that has an HTML template, customer and admin emails alike.
Designs are not used while WooCommerce's own block email editor draws the emails. Subjects, recipients and the on/off switch of each email stay in WooCommerce → Settings → Emails.